
Publish a Part as a Page
A .brep.ts part is code, so a person needs brepjs to see it. brep publish turns the part into a folder of static files. A visitor opens the page, moves a slider, and downloads a STEP file. The visitor installs nothing.
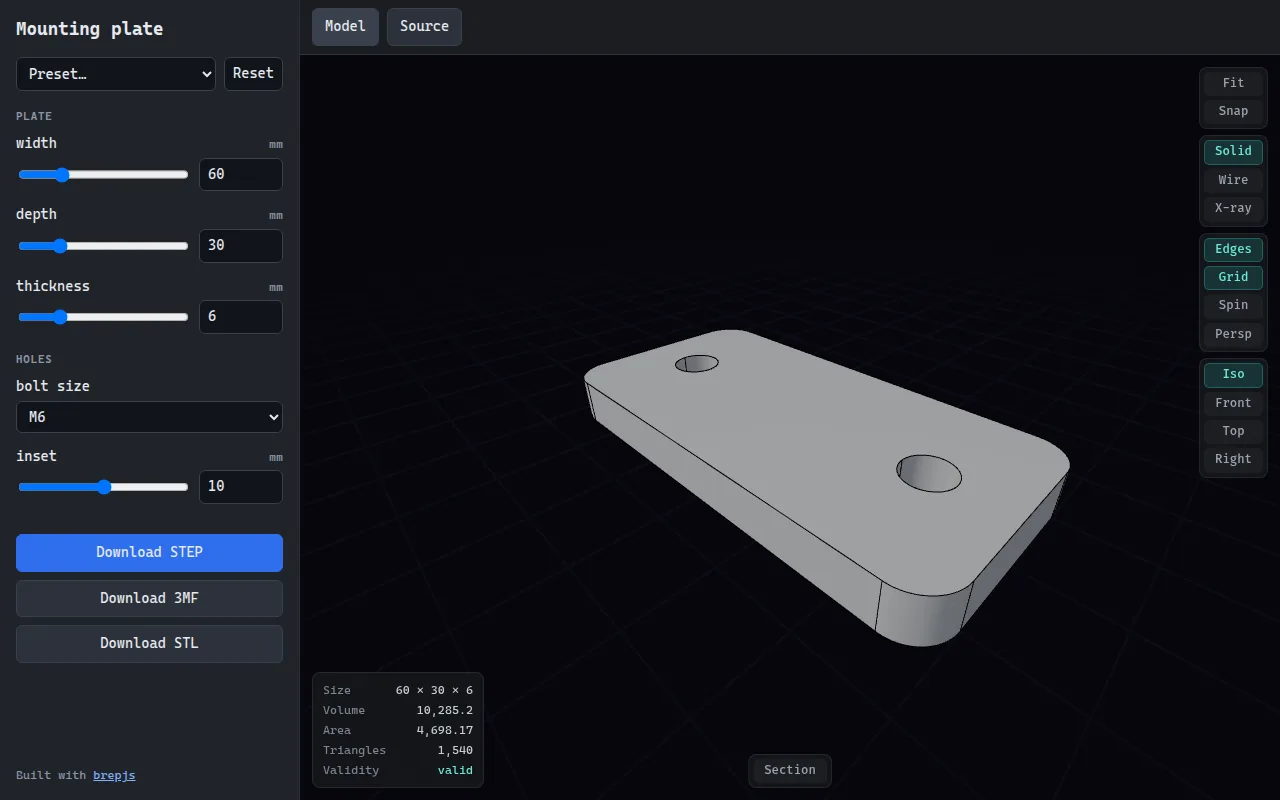
brep publish writes for the part below.The path has three steps: declare the parameters, verify the part at different sizes, and publish.
1. Declare the parameters
defineParams lists the values that a caller can change. The part function takes those values as its argument.
// plate.brep.ts
import { cut, defineParams, drawCircle, drawRoundedRectangle } from 'brepjs';

export const params = defineParams({
  width: { type: 'number', default: 60, min: 30, max: 160, unit: 'mm', group: 'Plate' },
  depth: { type: 'number', default: 30, min: 16, max: 80, unit: 'mm', group: 'Plate' },
  thickness: { type: 'number', default: 6, min: 2, max: 20, step: 0.5, unit: 'mm', group: 'Plate' },
  bolt: {
    type: 'choice',
    default: 'M6',
    options: ['M4', 'M5', 'M6'],
    label: 'bolt size',
    group: 'Holes',
  },
  inset: { type: 'number', default: 10, min: 6, max: 14, unit: 'mm', group: 'Holes' },
});

export const presets = {
  Small: { width: 40, depth: 20, thickness: 4, bolt: 'M4', inset: 8 },
  Large: { width: 120, depth: 50, thickness: 10 },
};

const CLEARANCE_RADIUS = { M4: 2.2, M5: 2.7, M6: 3.2 };

export default (p = params.values) => {
  using plate = drawRoundedRectangle(p.width, p.depth, 5).sketchOnPlane('XY').extrude(p.thickness);
  const holeX = p.width / 2 - p.inset;
  const hole = (x: number) =>
    drawCircle(CLEARANCE_RADIUS[p.bolt]).sketchOnPlane('XY', [x, 0]).extrude(p.thickness);
  using left = hole(-holeX);
  using right = hole(holeX);

  const drilledLeft = cut(plate, left);
  if (!drilledLeft.ok) return drilledLeft;
  using half = drilledLeft.value;
  return cut(half, right);
};
Three points about this part:
- The default argument.
(p = params.values)lets the part build at its defaults when a tool calls it with no argument. TypeScript infers the type ofpfrom the declaration, sop.boltis'M4' | 'M5' | 'M6'. - The
usingdeclarations. A page builds the part again for each change.usingreleases each shape that is not the result, so the memory of the page does not grow. For your editor to acceptusing,libintsconfig.jsonmust includeESNext.Disposable.brep initwrites that. - The presets.
presetsis optional. Each preset is a set of values by name, and the page shows the presets in a list.
Parameter types
| Type | Value | Fields |
|---|---|---|
number | A finite number | min, max, step, integer, unit |
boolean | true or false | |
string | Free text | maxLength |
choice | One string from a list | options |
Each type also takes default (necessary), and label, description and group for display. min and max are limits that the tools enforce. step is a hint for a slider. integer: true rejects a value with a fraction, for a count of holes or teeth.
2. Verify the part at different sizes
--param name=value builds the part with a different value. Repeat the flag for more than one value.
npx -y -p brepjs-cad brep plate.brep.ts --check
npx -y -p brepjs-cad brep plate.brep.ts --param width=120 --param bolt=M4
npx -y -p brepjs-cad brep export plate.brep.ts --step --param width=120
The report lists the values in use as params. A value outside its limits stops the build, and the report carries the reason:
{
  "ok": false,
  "errors": ["params: Parameter \"width\" must be <= 160, got 500"],
  "errorInfos": [
    {
      "message": "params: Parameter \"width\" must be <= 160, got 500",
      "code": "PARAM_OUT_OF_RANGE"
    }
  ]
}
Verify the part at the two ends of each range before you publish. A slider lets a visitor reach each value between min and max. Some combinations can fail, such as a hole larger than the plate.
To assert the size at each value, export expected as a function of the values:
export const expected = (p = params.values) => ({
  bounds: { xMin: -p.width / 2, xMax: p.width / 2, zMin: 0, zMax: p.thickness },
});
See the params contract for each error code.
3. Publish
npx -y -p brepjs-cad brep publish plate.brep.ts --out site --title "Mounting plate"brep publish verifies the part at its defaults first. It writes nothing when the report is not ok. Then it writes the folder:
| Path | Content |
|---|---|
index.html, assets/ | The page |
part/ | The part and the files it imports, as browser JavaScript |
part.json | The title, the entry file, and the source for the Source tab |
brepjs.js | One brepjs bundle that the page and the part share |
wasm/ | The geometry kernel |
fonts/ | The fallback font for a part that draws text, with its license |
Put the folder on any static host. The page needs no server and no special headers, and it works below a sub-path such as https://example.org/parts/plate/. To look at it on your machine, serve the folder with any static file server. The page does not open from a file:// URL, because a browser does not load modules from one.
What the visitor gets
- Controls. One control for each parameter. A number with
minandmaxgets a slider, a boolean gets a checkbox, and a choice gets a list.grouparranges the controls, andlabel,unitanddescriptionname them. - A link for each configuration. The page keeps the values in the URL (
?width=120&bolt=M4). A visitor can send that link, and it opens the same part. - A 3D view. The view has a section plane, the sizes of the part, its volume and area, and face inspection.
- Downloads. STEP, 3MF and STL. The page makes each file in the browser from the part on screen.
- The source. A Source tab shows the part and each file it imports.
When a value does not fit, or a build fails, the last good part stays on screen and the page shows the reason.
Limits
- A published part can import
brepjsand its own files. An import of another package stops the publish withPUBLISH_UNSUPPORTED_IMPORT. - The page uses the brepjs and the kernel that ship with
brepjs-cad, not those of your project. - The folder is about 23 MB, and the kernel is 21 MB of that.
brep publishwrites into an empty directory or over an earlier publish. It needs--forcefor a directory that holds other files.- On a screen narrower than 720 px, the page shows the model first and hides the view toolbar, the section control, and the face panel.
Use the declaration in your own app
defineParams and resolveParams are part of the brepjs library, with no dependency on the CLI. An app can read params.defs to draw its own controls, and call resolveParams to validate input before it builds:
import { resolveParams } from 'brepjs';
import part, { params } from './plate.brep.js';

const values = resolveParams(params, { width: '120', bolt: 'M4' });
if (!values.ok) {
  console.error(values.error.code, values.error.message);
} else {
  const built = part(values.value); // this part returns a Result, because `cut` can fail
  if (built.ok) {
    using shape = built.value;
    // mesh, measure, or export the shape
  }
}
resolveParams accepts a string for a number or a boolean parameter, so input from a URL or a form needs no conversion. The declaration is plain data: JSON.stringify(params) gives a description of the controls that you can send to a different thread or a server.
Next steps
- CLI Reference: each flag of
brep publish, and theparamscontract - Error reference: the
PARAM_*codes - The Verify Loop: how to read the report